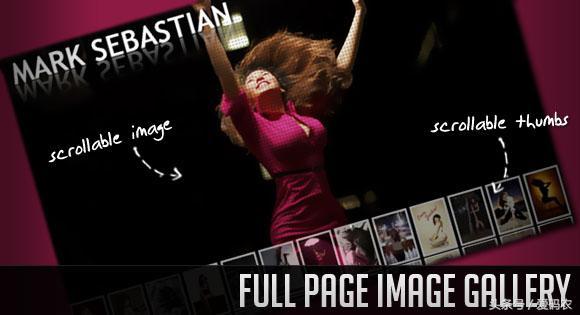
使用jQuery的完整页面图像库
发布时间:2018-01-20 23:49:09编辑:丝画阁阅读(954)
在本教程中,我们将使用可滚动的缩略图和可滚动的全屏预览创建一个令人震惊的完整页面库。这个想法是,当用户移动鼠标时,在页面底部有一个缩略图条。当单击缩略图时,它移动到页面的中心,并在后台加载全屏图像。现在用户可以上下移动,图像会自动滚动,给他一个看到所有图像的机会。
我们将使用一些CSS3 Webkit属性来增强功能的外观和jQuery。
这就是为什么在像谷歌Chrome或苹果Safari这样的Webkit浏览器中最好的观看演示。
我们将使用令人敬畏的jQuery thumbnail scroller。非常感谢他这个伟大而流畅的剧本!
我们将再次展示马克·塞巴斯蒂安的精彩照片。请访问他的Flickr页面或他的主页以获取更多关于他工作的信息。我们将使用的图像来自Flickr上的“IT因素”照片。
所以,让我们开始吧!

标记
HTML由一个主要的包装器div组成。在这个包装器的内部,我们将有完整的屏幕图像,一个漂亮的半色调模式效果的叠加,一个加载div,导航项和缩略图条:
我们还会添加一个"视图缩略图" div,当缩略图被隐藏时就会出现。
我们正在使用(滥用)图像的alt属性来保持完整图像的路径。
让我们来看看它的风格。
CSS
首先,我们将重置样式并为主体定义一些主要属性:
*{margin:0;padding:0;}body {background:javascript:;212121;overflow:hidden;font-family:Arial, Helvetica, sans-serif;text-transform:uppercase;color:javascript:;fff;font-size:10px;}
在下面的内容中,我们将定义可滚动的拇指容器的样式。大部分的风格是改编自Malihu缩略图照片卷轴。我们只是编辑了一些填充和边缘,并添加了一个webkit的反射到整个容器:
javascript:;outer_container{position:fixed;bottom:-160px;margin:0px 0px 30px 0px;height:130px;padding:0;-webkit-box-reflect:below 5px -webkit-gradient(linear,left top,left bottom,from(transparent),color-stop(0.6, transparent),to(rgb(18, 18, 18)));}
为了隐藏缩略图条,容器的底部值为负。当我们加载页面时,显示的是bar。
下面的类定义了缩略图容器内部元素的样式:
javascript:;thumbScroller{position:relative;overflow:hidden;}javascript:;thumbScroller .container{position:relative;left:0;}javascript:;thumbScroller .content{float:left;}javascript:;thumbScroller .content div{margin:2px;height:100%;}
缩略图会有一个白色的边框我们会把它们的高度限制在120px:
javascript:;thumbScroller img,img.clone{border:5px solid javascript:;fff;height:120px;}javascript:;thumbScroller a{padding:2px;outline:none;}
半色调图案由覆盖元件显示,当我们滚动时,覆盖元件将在所有屏幕上伸展并移动,因为它是固定的:
.fp_overlay{width:100%;height:100%;position:fixed;top:0px;left:0px;background:transparent url(../images/icons/pattern2.png) repeat-x bottom left;}
每当我们点击图像并等待完整图像加载时,加载div就会出现。它将在“50%的技巧”的帮助下集中在屏幕上:
.fp_loading{display:none;position:fixed;top:50%;left:50%;margin:-35px 0px 0px -35px;background:javascript:;000 url(../images/icons/loader.gif) no-repeat center center;width:70px;height:70px;-moz-border-radius:10px;-webkit-border-radius:10px;border-radius:10px;z-index:999;opacity:0.7;}
导航元素的样式如下:
.fp_next,.fp_prev{width:50px;height:50px;position:fixed;top:50%;margin-top:-15px;cursor:pointer;opacity:0.5;}.fp_next:hover,.fp_prev:hover{opacity:0.9;}.fp_next{background:javascript:;000 url(../images/icons/next.png) no-repeat center center;right:-50px;}.fp_prev{background:javascript:;000 url(../images/icons/prev.png) no-repeat center center;left:-50px;}
当导航物品放置在左边和右边,并垂直放置时,我们将在页面底部放置"切换"对象,以水平为中心:
.fp_thumbtoggle{height:50px;background:javascript:;000;width:200px;text-align:center;letter-spacing:1px;text-shadow:1px 1px 1px javascript:;000;position:fixed;left:50%;margin-left:-100px;bottom:-50px;line-height:50px;cursor:pointer;opacity:0.8;}.fp_thumbtoggle:hover{opacity:1.0;}
在每个浏览器中悬停一个div不会起作用,也可以用jQuery完成。
最后是全图的风格。这里我们设置的宽度总是100%,填满整个屏幕。这可能会使图像看起来像素化在大屏幕上,但我们有半色调模式来减少效果:)
img.fp_preview{position:absolute;left:0px;top:0px;width:100%;}
现在,让我们做一些魔术!
JavaScript
在我们的HTML文档的头部,我们将添加由Malihu提供的jQuery缩略图滚动条。我们将使用全尺寸,水平滚动和宽松。这就是为什么在加入jQuery脚本之后,我们还需要包含缓动脚本。
在jQuery函数中,我们首先定义一些变量:
//current thumb's index being viewedvar current= -1;//cache some elementsvar $btn_thumbs = $('javascript:;fp_thumbtoggle');var $loader= $('javascript:;fp_loading');var $btn_next= $('javascript:;fp_next');var $btn_prev= $('javascript:;fp_prev');var $thumbScroller= $('javascript:;thumbScroller');
然后我们将调用该函数showThumbs这将使缩略图容器出现在页面的底部:
showThumbs(2000);
接下来,我们将使整个页面能够在鼠标移动时垂直滚动。当加载一个完整大小的图像时,我们希望这个功能是可用的:
makeScrollable();
当我们点击缩略图时,会发生很多事情。首先,我们将创建一个当前缩略图的克隆,然后它将移动到页面的中心。然后我们将加载完整大小的图像,当它完成加载时,我们希望克隆缩略图扩展和淡出。我们还会隐藏缩略图并显示“查看缩略图”按钮:
$thumbScroller.find('.content').bind('click',function(e){var $content= $(this);var $elem = $content.find('img');//keep track of the current clicked thumb//it will be used for the navigation arrowscurrent = $content.index()+1;//get the positions of the clicked thumbvar pos_left = $elem.offset().left;var pos_top = $elem.offset().top;//clone the thumb and place//the clone on the top of itvar $clone = $elem.clone().addClass('clone').css({'position':'fixed','left': pos_left + 'px','top': pos_top + 'px'}).insertAfter($('BODY'));var windowW = $(window).width();var windowH = $(window).height();//animate the clone to the center of the page$clone.stop().animate({'left': windowW/2 + 'px','top': windowH/2 + 'px','margin-left' :-$clone.width()/2 -5 + 'px','margin-top': -$clone.height()/2 -5 + 'px'},500,function(){var $theClone = $(this);var ratio= $clone.width()/120;var final_w= 400*ratio;$loader.show();//expand the clone when large image is loaded$('![]() ').load(function(){var $newimg = $(this);var $currImage = $('javascript:;fp_gallery').children('img:first');$newimg.insertBefore($currImage);$loader.hide();//expand clone$theClone.animate({'opacity': 0,'top': windowH/2 + 'px','left': windowW/2 + 'px','margin-top': '-200px','margin-left': -final_w/2 + 'px','width': final_w + 'px','height': '400px'},1000,function(){$(this).remove();});//now we have two large images on the page//fadeOut the old one so that the new one gets shown$currImage.fadeOut(2000,function(){$(this).remove();});//show the navigation arrowsshowNav();}).attr('src',$elem.attr('alt'));});//hide the thumbs containerhideThumbs();e.preventDefault();});
').load(function(){var $newimg = $(this);var $currImage = $('javascript:;fp_gallery').children('img:first');$newimg.insertBefore($currImage);$loader.hide();//expand clone$theClone.animate({'opacity': 0,'top': windowH/2 + 'px','left': windowW/2 + 'px','margin-top': '-200px','margin-left': -final_w/2 + 'px','width': final_w + 'px','height': '400px'},1000,function(){$(this).remove();});//now we have two large images on the page//fadeOut the old one so that the new one gets shown$currImage.fadeOut(2000,function(){$(this).remove();});//show the navigation arrowsshowNav();}).attr('src',$elem.attr('alt'));});//hide the thumbs containerhideThumbs();e.preventDefault();});
当我们点击“查看缩略图”按钮时,我们将显示缩略图容器并隐藏按钮和导航元素:
$btn_thumbs.bind('click',function(){showThumbs(500);hideNav();});function hideThumbs(){$('javascript:;outer_container').stop().animate({'bottom':'-160px'},500);showThumbsBtn();}function showThumbs(speed){$('javascript:;outer_container').stop().animate({'bottom':'0px'},speed);hideThumbsBtn();}function hideThumbsBtn(){$btn_thumbs.stop().animate({'bottom':'-50px'},500);}function showThumbsBtn(){$btn_thumbs.stop().animate({'bottom':'0px'},500);}function hideNav(){$btn_next.stop().animate({'right':'-50px'},500);$btn_prev.stop().animate({'left':'-50px'},500);}function showNav(){$btn_next.stop().animate({'right':'0px'},500);$btn_prev.stop().animate({'left':'0px'},500);}
浏览图片的集合的事件一旦加载:
$btn_next.bind('click',showNext);$btn_prev.bind('click',showPrev);
接下来的两个函数将加载前一个或下一个图像,并将其置于当前将淡出的图像之前:
function showNext(){++current;var $e_next= $thumbScroller.find('.content:nth-child('+current+')');if($e_next.length == 0){current = 1;$e_next= $thumbScroller.find('.content:nth-child('+current+')');}$loader.show();$('![]() ').load(function(){var $newimg = $(this);var $currImage = $('javascript:;fp_gallery').children('img:first');$newimg.insertBefore($currImage);$loader.hide();$currImage.fadeOut(2000,function(){$(this).remove();});}).attr('src',$e_next.find('img').attr('alt'));}function showPrev(){--current;var $e_next= $thumbScroller.find('.content:nth-child('+current+')');if($e_next.length == 0){current = $thumbScroller.find('.content').length;$e_next= $thumbScroller.find('.content:nth-child('+current+')');}$loader.show();$('
').load(function(){var $newimg = $(this);var $currImage = $('javascript:;fp_gallery').children('img:first');$newimg.insertBefore($currImage);$loader.hide();$currImage.fadeOut(2000,function(){$(this).remove();});}).attr('src',$e_next.find('img').attr('alt'));}function showPrev(){--current;var $e_next= $thumbScroller.find('.content:nth-child('+current+')');if($e_next.length == 0){current = $thumbScroller.find('.content').length;$e_next= $thumbScroller.find('.content:nth-child('+current+')');}$loader.show();$('![]() ').load(function(){var $newimg = $(this);var $currImage = $('javascript:;fp_gallery').children('img:first');$newimg.insertBefore($currImage);$loader.hide();$currImage.fadeOut(2000,function(){$(this).remove();});}).attr('src',$e_next.find('img').attr('alt'));}
').load(function(){var $newimg = $(this);var $currImage = $('javascript:;fp_gallery').children('img:first');$newimg.insertBefore($currImage);$loader.hide();$currImage.fadeOut(2000,function(){$(this).remove();});}).attr('src',$e_next.find('img').attr('alt'));}
最后,当用户向上或向下移动鼠标时,将会使页面滚动的可显示功能:
function makeScrollable(){$(document).bind('mousemove',function(e){var top = (e.pageY - $(document).scrollTop()/2) ;$(document).scrollTop(top);});}
这是它!
不要忘记在Webkit浏览器中查看演示——尤其是在Safari中,你会得到一个神圣的平滑。
我们希望你喜欢这个教程和结果!
关键字:


